 Dynamic Mosaic -
Help Dynamic Mosaic -
Help |
Dynamic Mosaic -
Help
The main menu
The main
menu has the following functions File There are
three export functions: Save the (current) mosaic and Save the event log file. The current mosaic is best saved when the
dynamics are off. The mosaic picture that is currently visible in the (monitor)
viewer is what will be saved. In case of demonstrator mode also the nag text is copied. The last function is to
save the current list of images in the library folder. This is particularly
useful to make a list of the new booth pictures, e.g. for administrative purposes after the
event. The event log is the log data
that is updated with each event in the application, such as new source picture,
new tethered/booth picture found, and
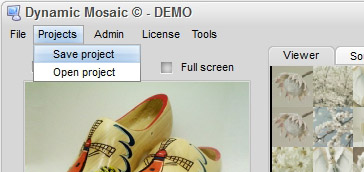
intermezzo message displayed. And others. Projects
Two functions are offered: Save the current settings as a
project file, and Open a
saved project file and overwrite the current
settings. Almost every setting is copied to the project file. Some specific
settings like web cam size and -controls are not kept. The checked source and
commercial files are also stored, but not by name but by sequence as found in the overview! When
adding new files in the folders after having saved a project might
lead to different source and commercial selections as originally saved. Admin
The
functions in the part of the menu are mainly used to quickly change a specific
setting, while the tabs can remain visible. These settings are: License
The application as downloaded from the internet, and installed on any systems will
by default run in a DEMO mode. In this mode a nag text is shown (some text is
customized, here for details). The customer who has a purchased a license file
has two information sources: Tools
This menu
function provide a couple of information
options: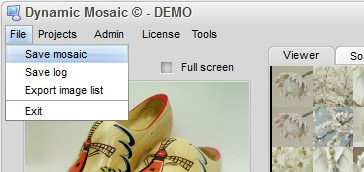
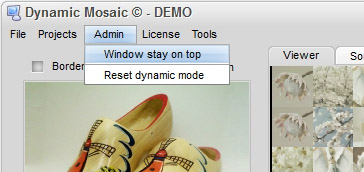
Window stay on top: when clicked the application's window will remain visible,
even when new windows are opened, such as a notepad, or other windows
applications. Is is particularly useful when the
technician doing some admin work on the same computer while the application is
running and needs to keep an eye on the progress and status.
Reset dynamic mode: in some rare cases an unlucky sequence of controls have been pressed and
the dynamics freeze. In that case this 'panic button' will fully restore the
dynamics, and the reset is hardly noticeable from the monitor.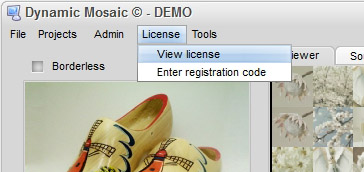
View license: the current status of used days and remaining days are shown.
In the example below: from
15 days of licensed use 13 days still remain.
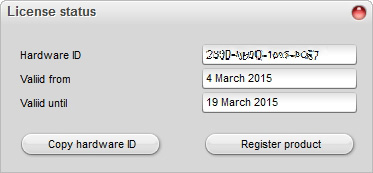
Enter registration code: the client has enter (or copy) the hardware code to
bind the license file to the specific machine it was intended for. In
the example below: the license started on March 4, and will expire 15 days later
on March 19. The hardware code that this licensed was bind to is shows as a 16
digit code with '-' between each block of 4 digits. To acquire a license the
customer must provide this unique hardware code to the vendor, who will use it
the create the license file. The 'Copy hardware' button will copy this code in the
clipboard, which can conveniently pasted (CTR+V) in the mail to request a
license file. The 'Register product'
button will activate the license file.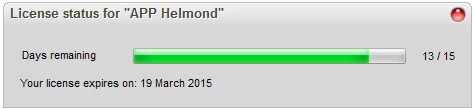
Help: this will open the help file. This file is a local
file, part of the installation.
About Dynamic Mosaic: the
version mnumber. Useful when support is needed fro the vendor.
Language: select the
language of the interface. Currently English, Dutch, German and French is
supported. When a language is changed not all data is updated, but only when
the corresponding control is used. Next time the application starts 100%
translation is done.
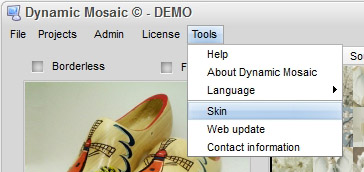
Skin: the skin of the
interface. Currently over 10 built-in skins are available. The default
skin is 'Snow Leopard'.
Web update: when a new
version is available here you can update and install the newest version. It's
very commendable to regularly check for new versions, where small bugs have
been removed and improvements have been applied.
Contact information: the contact information of your vendor is shown
here.